How To Create A Form Using Microsoft Word
It's a lot easier to create custom forms in Word than you might think and, certainly, much easier than it was many years ago. Under the Developer tab, Microsoft provides nine Content Controls, 12 ActiveX Controls, three Legacy Controls, and three Legacy Form features.
In Microsoft Word, Controls are pre-programmed tools that allow you to add and customize interactive content to your Word forms, templates, documents, and webpages. This article covers six of these Content Controls: Check Box, Combo Box, Drop-Down List Box, Rich Text and Plain Text Controls, and Date Picker. We'll add more controls in updates to this story.
A. Creating a custom form: First steps
Start with a new file, and ensure the Developer tab is available.
1. Select File > New > Document
2. Once open, ensure that the Developer tab is available on the Ribbon menu.
3. If not, select File > Options > Customize Ribbon.
4. When the Customize Ribbon & Keyboard Shortcuts dialog menu appears, navigate to the right side of the screen under Customize the Ribbon > Main Tabs. Click the Developer check box to add the Developer tab to the Ribbon, then click OK.
Now let's create some custom forms. For this exercise, we are creating a customer survey form for the residents of the Scottsdale, AZ community to fill out regarding the new Commercial Park and mall. Once complete and distributed, you can capture or export the residents' responses into a database (MS Access) or spreadsheet (Excel).
We've created the document so you can follow along and try all the features. Download it here:
download
Sample survey form document to try custom forms features JD Sartain
B. Next, insert a Check Box
1. Enter a survey question.
2. Press the Tab key (or press Return) to enter the optional answers.
3. Type in three or four options.
4. Select the Developer tab.
5. At the end of the first option, press the space bar, then click once to position the cursor for the insertion of a Check Box Control.
6. On the Developer tab, select the Check Box Content Control.
7. When the Check Box appears, notice that Design Mode is activated (under the Controls group).
8. Click the Properties button (also under the Controls group) instead.
9. The Content Control Properties dialog box opens.
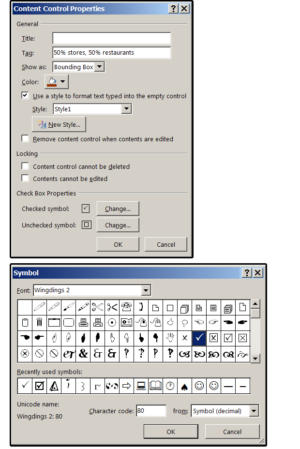
10. Enter the text for this Check Box in the Tag field, but not the Title field (for this one), unless you want duplicate titles (the one you entered on the form and this one).
11. From the Show As drop-down list box, select Bounding Box, Start/End Tag, or None. Try all three, then choose the one you like best.
12. Select a color from the Color field box, then click Use a Style to Format Text Typed Into an Empty Control and select a style from the list (or not).
 JD Sartain / IDG Worldwide
 Check Box Properties
13. I advise against checking the box that says: Remove content control when contents are edited; however, try it both ways, then decide which option works best for your project.
14. Under Locking, decide whether you want the content to be edited or deleted. Again, it depends on your project. Sometimes it's good to allow users to change their minds and edit or delete an option, while some projects should prohibit this action.
15. Under Check Box Properties, click the Change button and notice that you have, literally, thousands of options for the symbol that's placed inside the checkbox. You can also choose a symbol for the Unchecked Box.
16. Click OK when finished, then click Save As to save the form. Notice the file type Microsoft automatically adds to the form file (see section F, number 7).
C. The Combo Box and the Drop-Down List Box
With both the Combo Box and the Drop-Down List Box, you must select from a list of mutually exclusive values, which means you may choose only one option. The difference is that with the Drop-Down List Box, your selection is limited to the items on the list. With the Combo Box, you can enter a custom item that is not on the list, but not without custom-coding this option. Therefore, the following instructions are the same for both Combo Boxes and Drop-Down List Boxes.
D. Combo Box & Drop-Down List Box
1. Enter the following statement for number 2: Please select your favorite type of restaurant.
2. At the end of this sentence, tab over to 4.5 on the ruler, then select the Combo Box Content Control button from the Controls group under the Developer tab.
3. With the Control still selected, click the Properties button under Developer > Controls.
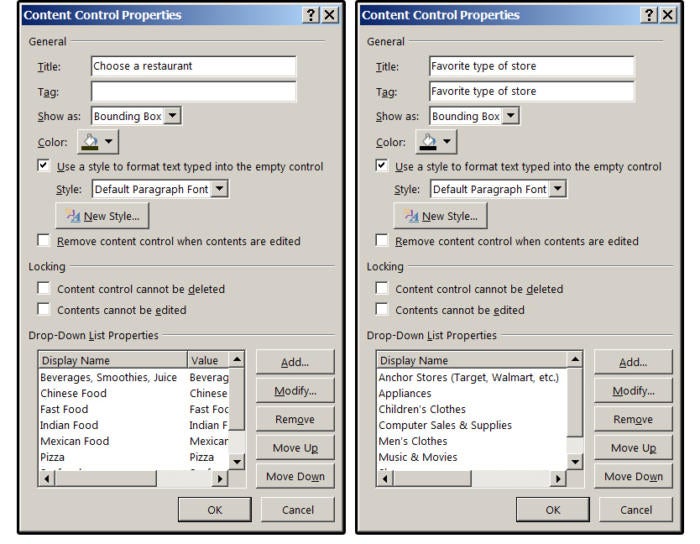
4. When the Content Control Properties dialog menu opens, enter a Title in the first field box under General (and a Tag, if you like).
5. Under Show As, select Bounding Box, Start/End Tag, or None.
Note: The default is Bounding Box, which means that the items in the List/Combo Box do not appear until you click the shaded rectangle.
6. As explained under Check Box above, choose a color, a style, and whether you want to allow the content to be edited or deleted.
7. After that, click the Add button and enter your list of items.
8. Once entered, you can rearrange the order by pressing the Move Up or Move Down buttons, and edit or delete an item using the Modify or Remove buttons.
9. Follow the instructions above to create a Drop-Down List box for number 3, but substitute the favorite restaurant statement with this statement instead: Select the type of store where you most frequently shop.
 JD Sartain / IDG Worldwide
 Combo Box and Drop-Down List Box Properties
E. Rich Text and Plain Text Content Controls
There's an important difference between Rich Text Format (RTF) Content Controls and Plain Text Content Controls. Rich Text Format (RTF) Content Controls support graphics, tables, objects, annotations, custom fonts, and font attributes. The Plain Text Content Control is just that: plain ASCII text that looks like Courier. It does not support any of the items that RTF supports, except it does allow some attributes such as Italics, Bold, etc. The catch: if you select bold, the entire text turns bold; that is, you cannot bold, italic, etc. a single word or group of words. If you want your forms to look nice, we recommend that you use the RTF Content Control.
1. Enter the following survey statements: Please describe why you support (or do not support) this project. Note: You may use format features such as Bold, Italic, etc. You can also change the font, insert photos/graphics, objects, tables, and/or annotations.
2. Tab over to 4.5 on the ruler. Select the Controls group under the Developer tab, then click the Rich Text Format Content Control button.
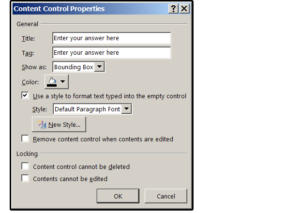
3. With the Control still selected, click the Properties button, and a slightly different Content Control Properties dialog window opens (not as many options).
4. Follow the instructions above, then click OK.
F. Date Picker Content Control
1. This one is simple. Enter the following statement for number 5: Please enter your birthdate (for demographic purposes).
2. Tab over to 4.5, select the Controls group under the Developer tab, and then click the Date Picker Content Control button.
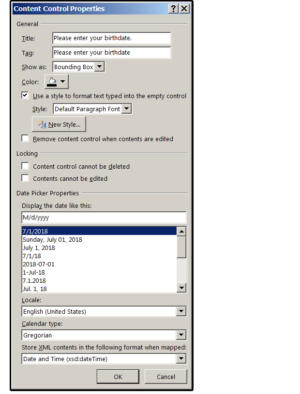
3. With the Control still selected, click the Properties button and another slightly different Content Control Properties dialog window opens (with more options).
4. Follow the instructions above for similar fields such as Title, Tag, Colors, etc.
 JD Sartain / IDG Worldwide
 Rich Text Content Control properties
5. Select a date format from the Display Date Like This List Box. We selected M/D/YYYY (a numeric month, two-digit day, and four-digit year); however, you may choose whichever format you prefer.
6. Choose the target Location, Calendar Type, and the format for the XML contents when mapped; (the default answers are generally correct unless your location is outside of the United States).
7. When finished click OK. Save your form with the filename New Business Survey (and note that Word saves it with a Macro format; that is .docm), then exit the form.
 JD Sartain / IDG Worldwide
 Date Picker Content Control properties
G. Restrict Editing
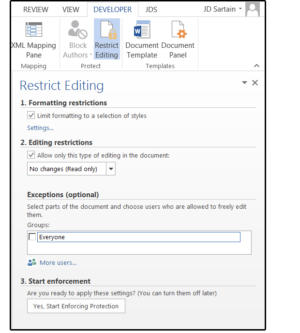
If you want to limit others from editing or formatting your form, and you did not specify this on each individual Content Control, use the Restrict Editing commands under the Developer tab.
1. Open the form.
2. Click Home > Select > Select All (or press CTRL+ A).
3. Click Developer > Restrict Editing (from the Protect group), and then choose your restrictions from the Restrict Editing panel on the screen right.
4. After selecting the restrictions you require, under number 3: Start Enforcing Protection, click Yes. Now your form is protected.
 JD Sartain / IDG Worldwide
 Restrict Editing on forms
H. Test your work
Open the form again, fill it out, and then save a copy to a new location. If any of the Content Controls fail, delete them, and then follow the applicable instructions above to enter the Content Control again. If something still fails, download the New Business Survey form at the link below. Good luck and have fun!
I. Next Time
When we next update this story, we'll add instructions for how to create and use Building Block Gallery Content Controls. Then catch us later for a detailed tutorial about ActiveX Controls.
There is a difference between Content Controls and ActiveX Controls. ActiveX Controls were initially developed for web pages; however, they can be used in other documents. They require macros to function and must be used cautiously. Content Controls do not need forms protection and do not require macros to work; however, macros can enhance their performance.
 JD Sartain / IDG Worldwide
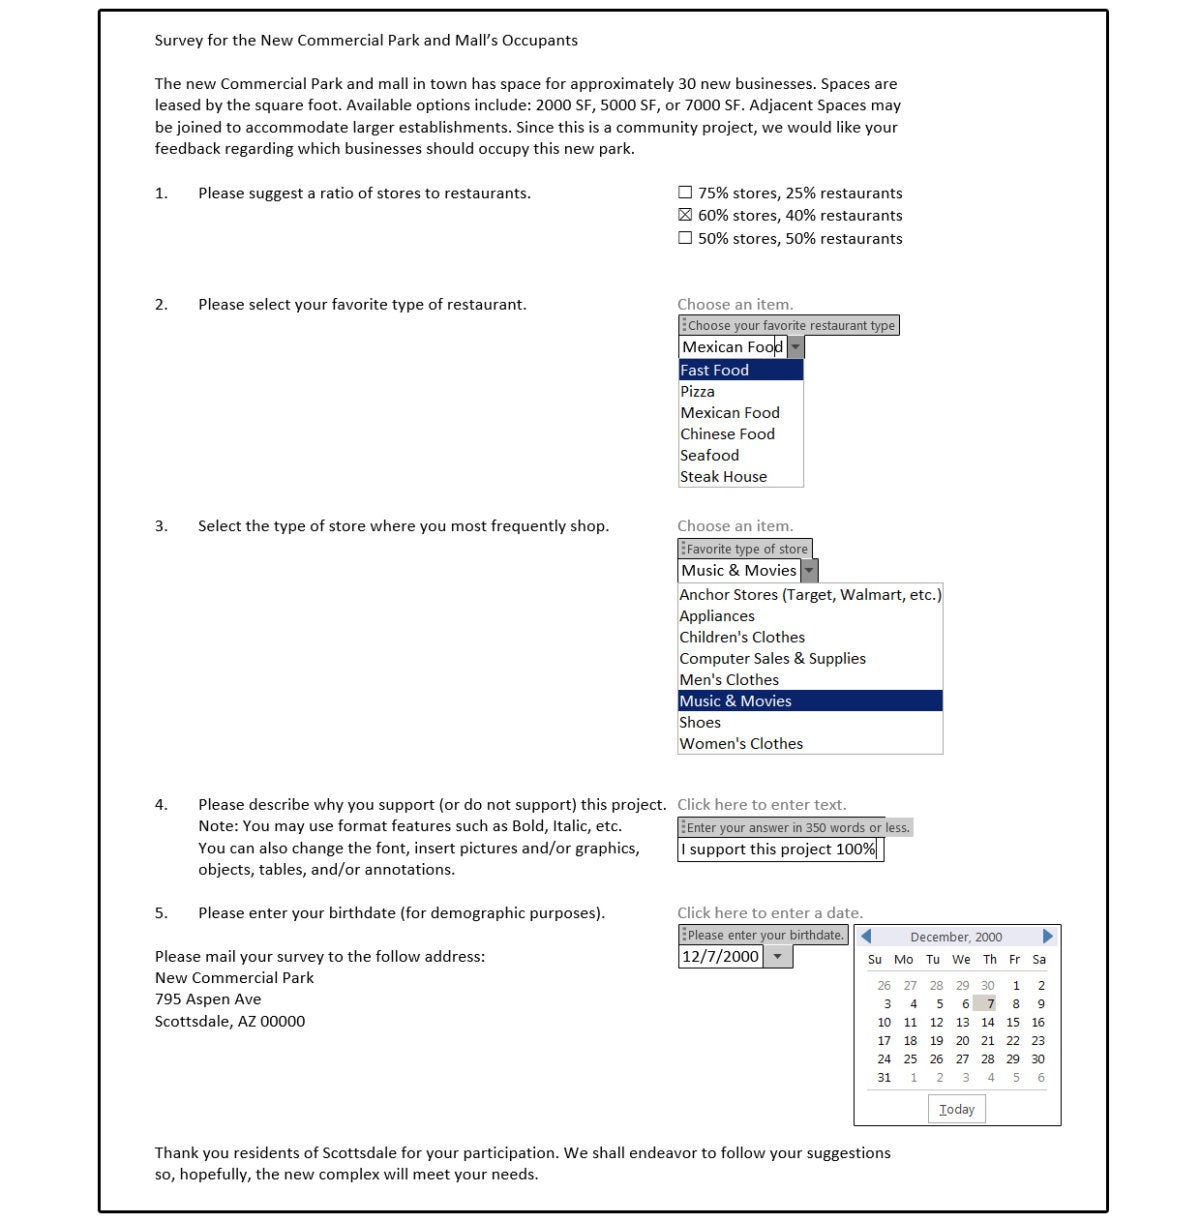
 New business survey form filled out
How To Create A Form Using Microsoft Word
Source: https://www.pcworld.com/article/3285976/how-to-create-and-use-custom-forms-in-word.html
Posted by: leboeuffroir2002.blogspot.com

0 Response to "How To Create A Form Using Microsoft Word"
Post a Comment